Monday, November 23, 2009

A Keepsake Taggie

A good friend of my mother's is having her fourth child soon and her baby shower was Saturday.  I have to say, she looks fabulous!  Mom made a quilt for the new baby, incorporating pieces of clothing from all five members of the family.  It took her forever, but it was really worth all the effort.  It turned out beautiful!

So, Friday evening rolled around and I reallized that I had no baby shower gift!  I had planned on using the clothing scraps from Mom's quilt in my gift, but just hadn't gotten around to planning what I was going to make.  I went through several options in my head on Friday, and I decided to cut the clothing scraps into 1" squares and make tiny quilt blocks.  I used them to make a taggie blankie and a rattle, but the rattle got scrapped at the last minute.


For the tiny quilt blocks, I ironed the 1" squares to 5" squares of fusible interfacing, one at a time. I then ironed the 5" squares onto an old baby sleeper from my "spare parts" bag.  Next time, though, I'll use woven fabric.  This stuff had more stretch in it than I wanted.


Anyway, I cut out my squares and quilted them on my sewing machine, using a tight zigzag stitch, then sewed four squares together, making the top of my little taggie blankie.


I cut various lengths of different types of ribbon from my ribbon stash and sewed them into loops.  I just fed them through the machine, one after the other, and ended up with a long strip of loops.  This was just to keep them folded over while I put the whole thing together.


I paired up the quilted top with a scrap of white fleece, right sides together, then clipped the ribbon loops apart and stuck 7-8 between the two layers, lining up the edge of the ribbon with the edges of the fabric.


I sewed this edge together, with the ribbons sandwiched in between, before pinning the next side.   With each subsequent side, I made sure to pin back the ribbons that were already sewn on, so they wouldn't get caught in the new stitches.


On the last side, I left a two inch opening and turned the blankie right side out.  I pressed it flat, then pinned the remaining two ribbon loops into the opening.


I topstitched all around the blankie and was finished!


I then attempted to make a matching rattle.  I rather impressed myself by using a paperclip and this little bubble from a toy vending machine, superglued shut, as the inside of the rattle.

 
I cut circles out of the two remaining quilted 5" squares and, right sides together, stitched around the edge.  I apparently can't sew an even circle, because when I turned it right side out and stuffed it, this is what it looked like.  In theory, I was going to add the ribbon handle and stitch it shut, but in reality, it went in the scrap pile.


Oh well.  Better luck next time.  At least the taggie was cute!

Friday, November 20, 2009

What To Do With Un-Wearable Denim

If your weight fluctuates as often as mine does, or even close, you have a stash of 'fat' clothes, as well as a stash of 'skinny' clothes.  Both of my stashes include several denim pieces - jeans, shorts, skirts, jackets...

Being in the middle of my "buy-nothing" month, I have to search my house for project materials.  I've often had ideas for using up all of the denim I never wear, but I never followed through on any but the smallest of those ideas... until now.  Here, for your crafting pleasure, I demonstrate how I intend to use up my denim stash.


5.  Purse


These are for sale, but I'm sure I could make them.

7.  Apron (from overalls)
Use a pair of overalls for this project. Cut the seams of the legs apart and then sew both of the front legs together and then both of the back legs together. Slip over you head for a great apron. You can also use as a great overall dress. Quick and easy. (www.allfreecrafts.com)


I love the durability of denim and think that, even if you can't get large pieces from your jeans, there are tons of things that would be great if made from smaller pieces or patchwork denim fabric; throw pillows, tool belts,  those fabric flowers I like to make, casual curtains, picnic blankets, baby bibs, diaper bags, carrying strap for cameras or guitars, text book covers, or anything else that gets a lot of use.

Have other ideas or examples?  Share them in the comments section!

Thursday, November 19, 2009

Unique Notes

I love sending snail mail, but even the prettiest stationary gets a little boring at times.  Here are some ideas for sending snail mail notes on unusual mediums.


  • Ribbon Letter
For this one, I used an empty ribbon spool and a 12" x 12" piece of scrapbook paper.  I cut circles out to cover the top and bottom of the spool, then cut the rest into 3/8" strips, to fit on the spool.  I wrote the letter on the strips, keeping them in order, then taped the last one to the spool and started winding.  At the end of each strip, i taped the next one on and kept winding, until I got all the way to "Dear Bonnie," at the begining. 


  • Book Greeting Card
I found this paperback at Deals for a dollar and, knowing how my grandpa LOVES westerns, thought I would send him a little note in it.  I wrote the words very lightly in pencil, then Little Bear traced them.  I think he'll love it - I know I would!


  • Seed Packet Card
Garden or farming supply stores have seeIf you don't want to write your note directly on the seed packet, or there isn't room, just print out this template from The Month of the Military Child to make your own packet.  Either way, a sweet note written on a packet of seeds would make any gardener happy.


  • CD Greetings
Know a music lover?  Take the cover art out of the jewel case of a CD you know they'll love.  Cut a piece of plain paper to fold in half and replace the cover art.  Design your own cover art on the outside and write your friend a note on the inside.  Mail it in a padded envelope or CD box.  Alternatively, you could record your child/children singing, reading, and telling stories.  Let them design the cover art for an empty jewel case, burn their recordings to a recordable CD, and you have a lovely way to send a letter to Grandma and Grandpa.


  • Message in a Bottle
Write or print your letter on some pretty stationary and put it in an envelope.  Wash out a plastic soda or water bottle (make sure it's big enough for whatever you're sending) and let it dry thoroughly, then remove the label.  Super glue the lid onto the bottle, then cut two 4 or 5 inch vertical slits in the side, connected by a horizontal cut (making a tall, skinny H shape).  Fill the bottle with shredded paper or tissue paper, then slip your letter inside.  You can also put small gifts in the bottle to go with the letter.  Seal the opening with clear packing tape, then cover the opening with a self-stick shipping label and take it to the post office.  (I haven't tried this yet. The pic is from Instructables.)

Have other ideas for unusual snail mail mediums?  Share with us!

A T-Shirt Pillow for Little Bear

My daughter and I went through her dresser drawers this week, putting summer things in storage and too-small things in a box to donate, making room for the winter clothes.  One of the too-small shirts was one from her last day at pre-school.  They had all worn plain t-shirts and signed them with permenant markers. 

Little Bear, of course, didn't want to part with this keepsake, so I suggested we make a pillow out of the signed parts of the shirt.  This was not acceptable, however, because she wanted it to still look like a shirt.  Her solution was to just stitch closed the neck, arms, and waist of the shirt and stuff it a little bit.  I think it turned out just the way she wanted it to.


Tuesday, November 17, 2009

A Soffee Scarf

I love saying "soffee" instead of "soft" or "softie," because that's what Little Bear always said when she was... well, little.  We would walk past a rack of sweaters in the department store and her little hand would reach out from the seat at the front of the cart.  She would stretch her fingers to try to brush against the hanging clothes and when she did, this expression of absolute contentment and happiness would come over her as she sighed, "Soffee!"  So, when I finally finished this scarf, I happily wrapped it around me, rubbed it against my cheek and exclaimed, "Soffee!"


(Special thanks to my model!!)

This is the scarf I started back in October.  It's made from that luxuriously soft, 65% silk, deep plum colored sweater that I picked up for $2 at a local thrift store.  I'm not the fastest crocheter in the world, so it took me awhile, but I LOVE how it turned out!  Yes, it's a Christmas gift.  NO, I'm not going to say who it's for!  :-)  Happy Tuesday!!

Sunday, November 15, 2009

Felted Soaps, a la Anthropologie

My inspiration for this gift came from these at Anthropologie.  This week's birthday girl was with me when I found them and I thought she might faint from excitement!  They are so soft and pretty, not to mention their beautiful scents!  So, of course, I had to make some for her.


I picked up a 75% wool scarf and a couple of bars of scented soap from the dollar store.  I washed the scarf in hot water a couple of times, then dried it on high heat to get it nice and felted.  Then I wrapped it around the soap just the way I wanted it and marked the shape with chalk.  I cut a piece that would cover the whole bar, without leaving much wiggle room.  I wanted the wool to fit snugly against the soap.  I folded the piece long-ways, wrong side out, and did a blanket stitch in upholstery thread along the long side, creating a tube of felted wool.  Next, I adjusted the fold so that the long seam was in the center of my flattened tube.  For the oval-shaped soap bar, I rounded the corners of the tube with my scissors before closing the ends.

I blanket stitched one end closed, then stuck the soap inside to check the fit. For both soaps pictured below, I had excess fabric at the open end when I did this.  Leaving the soap inside, I cut the tube to just about a quarter of an inch beyond the end of the soap.  Again, I rounded the corners for the oval-shaped soap bar.

I took the bar of soap out and flipped the pouch right side out, checking my seams for holes as I went.  I stuck the soap back in the pouch and did a tight blanket stitch to close the open end.  Once it was done, I checked it over again for any holes (hand stitching a bulky knit is tricky!) and took it to the sink.

The soaps at Anthropologie were totally infused in the fabric of the felt pouches, which I loved.  I soaked my felted soaps in the hottest water I could stand and worked them into a good lather.  When the wool was good and soapy, I rinsed the soap bubbles off and re-adjusted the felted pouches.  They slid a little bit with the lathering, so I just moved them back to where they started. 


After that, I just set them on the edge of the bathtub and waited for them to dry.  I tied ribbons around the soaps and wrapped them up in a box, tied with the same ribbon, plus a cute tag from Angry Chicken.  Happy birthday, Ree!

Jewelry Box Advent Calendar

I have always loved advent calendars, but I never had one growing up.  Every year I intend to make one, but then all of my day-to-day obligations get in the way and time gets away from me and suddenly it's the middle of December!  Well, I've seen so many cute advent calendars this year that it inspired me to get going and finally make one for myself and Little Bear.  Here's what I made.


Materials:
24 dollar store jewelry boxes (3 per package)
Christmas scrapbook paper
letter stickers and rub-ons
coordinating ribbon
1" circle punch
glue stick
ink pads
hot glue gun
3-D foam tape


I measured the jewelery boxes and cut paper for the fronts of all 24 of them, then used my gluestick to glue them on.


Inside the boxes were these little pieces of fiberfil, which will become batting in another project.


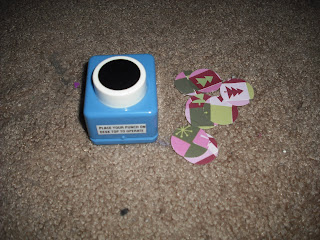
Once the boxes all had paper fronts, I used my 1" circle punch to make circles from coordinating paper.  I then used a rolled up scrap of fleece to ink the edges of my circles.


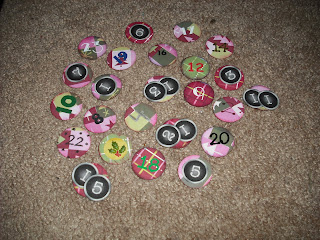
I got out my stash of letter/number stickers and rub-ons to number the circles.  For the 24th one, I put a holly sticker on the circle, then drew 24 on the box with a green marker.  Next, I traced the number with glue and covered it with crystal glitter.


I sprayed all of the box tops with clear gloss finish spray.  While the tops were drying, I cut 24 6" strips of ribbon, then glued them in loops to the backs of the jewelry boxes.


After everything was dry, I put them all in a pretty Christmas gift bag.  I can't wait to get the tree put up, so I can fill these and hang them on it!!  Little Bear's going to LOVE IT!!