My inspiration for this gift came from these at Anthropologie. This week's birthday girl was with me when I found them and I thought she might faint from excitement! They are so soft and pretty, not to mention their beautiful scents! So, of course, I had to make some for her.
I picked up a 75% wool scarf and a couple of bars of scented soap from the dollar store. I washed the scarf in hot water a couple of times, then dried it on high heat to get it nice and felted. Then I wrapped it around the soap just the way I wanted it and marked the shape with chalk. I cut a piece that would cover the whole bar, without leaving much wiggle room. I wanted the wool to fit snugly against the soap. I folded the piece long-ways, wrong side out, and did a blanket stitch in upholstery thread along the long side, creating a tube of felted wool. Next, I adjusted the fold so that the long seam was in the center of my flattened tube. For the oval-shaped soap bar, I rounded the corners of the tube with my scissors before closing the ends.
I blanket stitched one end closed, then stuck the soap inside to check the fit. For both soaps pictured below, I had excess fabric at the open end when I did this. Leaving the soap inside, I cut the tube to just about a quarter of an inch beyond the end of the soap. Again, I rounded the corners for the oval-shaped soap bar.
I took the bar of soap out and flipped the pouch right side out, checking my seams for holes as I went. I stuck the soap back in the pouch and did a tight blanket stitch to close the open end. Once it was done, I checked it over again for any holes (hand stitching a bulky knit is tricky!) and took it to the sink.
The soaps at Anthropologie were totally infused in the fabric of the felt pouches, which I loved. I soaked my felted soaps in the hottest water I could stand and worked them into a good lather. When the wool was good and soapy, I rinsed the soap bubbles off and re-adjusted the felted pouches. They slid a little bit with the lathering, so I just moved them back to where they started.
After that, I just set them on the edge of the bathtub and waited for them to dry. I tied ribbons around the soaps and wrapped them up in a box, tied with the same ribbon, plus a cute tag from Angry Chicken. Happy birthday, Ree!
Showing posts with label dollar store. Show all posts
Showing posts with label dollar store. Show all posts
Sunday, November 15, 2009
Jewelry Box Advent Calendar
I have always loved advent calendars, but I never had one growing up. Every year I intend to make one, but then all of my day-to-day obligations get in the way and time gets away from me and suddenly it's the middle of December! Well, I've seen so many cute advent calendars this year that it inspired me to get going and finally make one for myself and Little Bear. Here's what I made.
Materials:
24 dollar store jewelry boxes (3 per package)
Christmas scrapbook paper
letter stickers and rub-ons
coordinating ribbon
1" circle punch
glue stick
ink pads
hot glue gun
3-D foam tape
I measured the jewelery boxes and cut paper for the fronts of all 24 of them, then used my gluestick to glue them on.
Inside the boxes were these little pieces of fiberfil, which will become batting in another project.
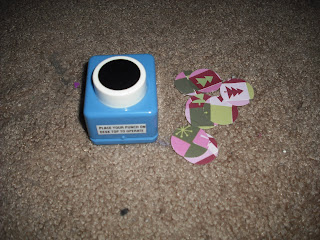
Once the boxes all had paper fronts, I used my 1" circle punch to make circles from coordinating paper. I then used a rolled up scrap of fleece to ink the edges of my circles.
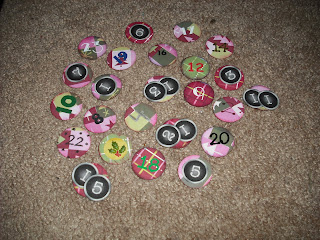
I got out my stash of letter/number stickers and rub-ons to number the circles. For the 24th one, I put a holly sticker on the circle, then drew 24 on the box with a green marker. Next, I traced the number with glue and covered it with crystal glitter.
I sprayed all of the box tops with clear gloss finish spray. While the tops were drying, I cut 24 6" strips of ribbon, then glued them in loops to the backs of the jewelry boxes.
After everything was dry, I put them all in a pretty Christmas gift bag. I can't wait to get the tree put up, so I can fill these and hang them on it!! Little Bear's going to LOVE IT!!
Wednesday, November 11, 2009
Pretty Holiday Photo Holder
I wanted to make something cute to give to my former boss for Christmas. I'll probably make her an ornament for her tree, as well, but I think she'll like this and it was SO EASY! I bought the wooden word "Faith" for $1 at, where else?, the Dollar Tree. The rest of the materials I had on hand.
Materials:
Wooden word
Red Sharpie
Glitter
Tiny Clothespins
I colored the whole thing with the sharpie first, and it ended up looking like a red wood stain. I liked it!
Don't laugh too much at my black fingers. I was trying to dye some fabric and, well, when they say "wear rubber gloves," they mean it!!
I painted glue on the letters and shook my crystal glitter over them, one letter at a time, then glittered the front of the base, also.
Once the glitter was finished, I glued tiny clothespins to the backs of each letter.
Once the glue was dry, it was ready to be boxed, wrapped and given. So easy!
Monday, November 2, 2009
Freecycle Fridays
I just love the ideas I find at Not So Idle Hands, especially Emily's Freecycle Fridays! My favorite crafts are usually the ones I make without spending a dime, but sometimes it's hard to look at all of the things you have - things you see every day and have just become part of the backdrop of your life - and think of creative ways to repurpose them. Thanks for the great ideas, Emily!
Tuesday, October 13, 2009
Awesome Play Makeup!!
This idea came from Emily at Not So Idle Hands. She cleaned out used makeup containers and added fingernail polish to create beautiful, fun play make-up for her daughters. I thought these were so cool and just had to try it out, myself! (the pic on the right is from Not So Idle Hands; the pics below are mine)
I dug through my make-up basket last night, in search of partially used and no longer useful items. I found three eye shadow containers and one lip gloss case with a nice big mirror. I cleaned them all out, let them dry, then dug through my nail polish basket (yes, baskets are how I organize) to find just the right colors. I chose the cheaper polishes and those that were almost empty and got to work.
Just like in Emily's tutorial, I made sure to pour the polish slowly into each little tub. My hands aren't as steady as hers, but I think I'll get it right with a little practice. For now, my six year old (HAPPY BIRTHDAY, BABY BEAR!) can play make believe princess without making a big, powdery, sparkly mess.


